Saturday, March 31, 2012

Better Than Scone Muffins

I just received my order of a 1/2 pound bag of vanilla beans (got 'em here) and I'm so excited to find new uses for them! I had a few left over Meyer lemons and some ricotta from earlier projects, so I decided to try a new recipe. These muffins turned out perfectly! They are so light and sweet and beautiful that I had to share. I didn't take many pictures, sorry...

Lemon Vanilla Ricotta Muffins

(adapted from Giada's recipe) 

2 cups all-purpose flour 
1/2 teaspoon baking powder
1/2 teaspoon baking soda 
1/2 teaspoon salt
1 cup sugar
1/2 cup (1 stick) unsalted butter, room temperature
1 tablespoon finely grated Meyer lemon zest (about 2 lemons, can use regular lemons)
1 cup whole-milk ricotta cheese (I used part-skim, because that's what I had- worked fine)
1 large egg
1 vanilla bean
1 1/2 tablespoons fresh lemon juice
Crunchy sugar

1. Pre-heat oven to 350*.
2. Grease muffin pan or line with muffin papers. 
3. Whisk together flour, baking powder, baking soda and salt in medium bowl.
4. In large bowl, mix sugar, butter and lemon zest until light yellow and smooth.
5. Add ricotta, mix mix mix until all the ricotta is mixed in and batter is lump-free.
6. Mix in egg, the scrapings of the vanilla bean and the lemon juice.
7. Slowly add in the flour mixture. Batter will be thick and light- almost like biscuit dough consistency.
8. Scoop into prepared muffin pan. Cups will be almost full. Sprinkle crunchy sugar on top (if desired).
9. Bake in pre-heated oven for about 20 minutes, or until the edges are light golden. 
10. Yum yum yum!! Eat 'em up!


Dang carbs, why do you have to be so delicious??


I'm on my second muffin of the morning already... They're so good, they might even be better than my scones... hmmm...

Look for another new post this week that's NOT about food products!!

-Celina

Monday, March 26, 2012

Gluten-Free Chocolate Almond Torta Caprese

The other night, to go along with my lasagna, sorta-Italian-themed date-night-at-home dinner, I decided to make a yummy chocolate almond torte that Titina taught me how to make. We took her class before we moved from Raleigh this summer. It was such a fun experience, and such delicious food! This rich dessert is perfect served slightly warm with a little vanilla gelato and an espresso. Or with a latte for breakfast...

This recipe is gluten-free! Yay! Hope you enjoy a break from my scone obsession!

Torta Caprese

1 cup semi-sweet chocolate (or dark- can use block or chips)
1 1/2 cup whole almonds (or sliced, slivered, chopped, whatever you have on hand)
1 1/4 cup sugar
6 eggs
2/3 cup olive oil (I substituted applesauce and it worked just fine!)
1/4 cup water (I used espresso for a little kick, but I couldn't taste any difference)

1. Grease a 9"-10" round pan. Preheat oven to 400 degrees.

2. Put chocolate and almonds in food processor. Chop until finely minced.

I wanna eat it just like this!!

3. Beat sugar and eggs together until light yellow and slightly frothy.

4. Add oil and water very slowly. (side note: my mixer is 1. stored on top of my cabinets and getting it down involves either climbing up the counter like a monkey or moving furniture, and 2. even on the lowest speed, shoots flour, eggs, sugar, etc on the ceiling, so I rarely use it, but a whisk worked just fine! One day, when I have a kitchen bigger than a shoebox, I'll have a shiny red Kitchenaid stand mixer- so pretty ...one day... Ok, enough dreaming, back to baking.)

5. Slowly and gently stir in the chocolate and almonds until thoroughly mixed.

6. Pour in greased pan.

7. Bake for about 50 minutes, or until the center is cooked through. Cool slightly, leave in pan- if you try to take it out, it'll probably fall apart.

doesn't look as pretty here...


forgive the dirty fork, I couldn't wait to dig in!

Hope you all had a wonderful weekend!

-Celina

Friday, March 23, 2012

Cinnamon Banana Bread

I have been craving banana bread lately and I looked in my freezer and found exactly what I was looking for! SIX browned and frozen bananas! Double recipe of Banana Bread - here I come! I am using my mom's recipe for Banana Nut Bread but I am adding a little twist a friend of mine introduced me to - cinnamon sugar! 
Check your pantry, here are your ingredients for the Banana Nut Bread (for a single recipe - I am going to make a double recipe):  
1 cup sugar
1/2 cup crisco
1 teaspoon baking soda
1 tablespoon sour milk
3 bananas, mashed
1/2 cup of walnuts
2 cups flour
1/2 teaspoon salt
Beat sugar and crisco together. 
Add the baking soda to the sour milk and add this mixture to your sugar and crisco. Blend well. 
Add the nuts and bananas and mix. 
Add the flour and salt. Mix well. 
Spoon dough into one large (greased and floured) bread pan, or two small (greased and floured) bread pans. If you want to do the CINNAMON Banana Nut Bread - Mix cinnamon and sugar in a small bowl. Instead of pouring the dough into greased and floured bread pans, substitute the cinnamon-sugar mixture instead of the flour. After the dough is in the pans, sprinkle a little more cinnamon-sugar onto the top of the breads before putting them in the oven. 

Bake at 350 for about an hour, or until browned on the top. Remove from the oven and lay pans on their sides to cool some before removing the breads to cool the rest of the way (allow bread to cool on its side out of the pans as well).  
I chose to make muffin toppers and mini-loaves instead of whole loaves of bread. My double recipe made 12 muffin toppers and 8 mini-loaves. The muffin toppers only took 13 minutes to bake and the mini-loaves took 30 minutes. 

As an extra sweet treat, mix a little powdered sugar and milk together to make a thin frosting/glaze. Drizzle over a slice of bread for a more cake-like dessert.


mmmmm!


- Kim

Thursday, March 22, 2012

Hello world!

Kim introduced herself, so I guess I should officially introduce myself, too. I sort of came out with a bang- I was soooo excited about my scones, I forgot to tell you about me!

I'm Celina, married for 5 1/2 years to my wonderful teacher/baseball coach hubby, and we have two girls. Our little J is 6 months old and growing so fast. She loves to play and laugh and roll around the living room- she'll be crawling before we know it! She is stubborn and determined and so sweet. And our fur-child, Addy, is a 60-pound Belgian Malinois- Australian Shepherd (?) mix and is almost 5. She's lacking in common sense, is neurotic and hyper- anyone want her? (I'm only half joking...) I am so blessed and grateful to be able to stay at home with them. I love learning new things, and am always trying new projects (just come look at our office/ sunroom/ project room/ junk pile space!). I am going to be training for my second marathon this summer- a bit more of a challenge this time around since I'll be pushing the stroller for most training runs!

There. I did it. Now you know a tiddly bit about who I am. And on to my new scone creation. :-) I just made these this morning and they are so delicious that I couldn't wait to share them! And I took pictures along the way to help those visual learners (like me!). Forgive my almond-colored, fluorescent-lit kitchen- I have been so blessed with a kitchen that meets, and maybe even exceeds, my family's needs, and yet somehow is the size of a shoebox.


Meyer Lemon/ Toasted Coconut/ Vanilla Bean Scones 

(have you started drooling yet?)

1 cup oats
1 1/4 cup all-purpose flour
1/3 cup white sugar
1 1/4 tsp baking powder
1/4 tsp baking soda
1/2 tsp salt
8 tbsp butter, frozen
1/3 cup plain greek yogurt
1 egg 
3/4 cup toasted coconut
2 Meyer lemons
1 vanilla bean

1. Pre-heat oven to 400 degrees. 

2. In food processor, use chopper blade to grind oats into a fine powder.
chop chop
until it looks like this
3. In medium bowl, mix oats, flour, sugar, baking powder, baking soda, salt and 1/2 cup of toasted coconut. 

lemons waiting their turn!

4. In food processor, use slicer blade to grate butter into shreds. (I find it easier to cut the butter in half and grate it 1/2 at a time.)
5. Dump all the butter shreds into dry mix. Mix it all up together.

6. Zest the lemons into the bowl, then carefully (so you don't get seeds in the dough) squeeze the juice from both lemons into the dough (maybe about 1-2 tablespoons of juice?). 

7. In a small bowl, mix yogurt and egg. Slice open the vanilla bean and scrape all the deliciousness (I guess they're seeds... never really thought about it before) into the bowl.
before the vanilla bean.
8. Dump egg goo flour mixture. Mix up until large clumps form.

9. Take off your rings- you're about to get gooey. :-)
10. Use your hands to press the dough against the bowl and kneed until a big ball forms and all the dry stuff is mixed in. (It might take a few minutes, but don't add any more liquid if it seems dry, it'll come together soon).  
still looking a bit dry, but it'll ball up, no worries. :-)
I look like I have alligator hands with huge Angelina Jolie veins. Sorry 'bout that.
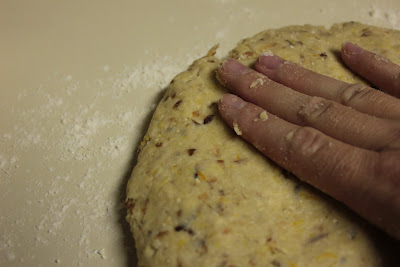
11. On lightly floured surface, pat dough ball into a circle about 3/4 to 1 inch thick.
12. Sprinkle with the remaining coconut (or crunchy sugar like demerara or turbinado if you prefer), and lightly press so it sticks. Slice into either squares or triangles (like a pie) with a sharp knife or pizza cutter.
YUM!!!
 
13. Put on a parchment paper lined baking sheet about 1 inch apart. Bake until golden- about 15 minutes.
GET IN MA BELLY, SCONES!!
14. Let cool a bit. Make some coffee. Grab your Bible or another good book. Enjoy!
  
perfect breakfast.


Now, what to do with the rest of these beautiful lemons?? Hmmm...

-Celina

Sunday, March 18, 2012

Kim Here

Hello! This is Kim! Celina and I are so excited to share our adventures in cooking, baking, crafting, motherhood and life with anyone interested in reading. Mostly, this is a chance for us to share what makes us tick. I hope you find something helpful, fun or interesting within these posts. 

I would like to take a moment to introduce myself. I am a 20-something (not sure I want to admit my true age, as it is pushing 30) wife and mother. My husband Brian and I have been married for almost 4 years and we have a 7 and a 1/2 month old we've nicknamed Little Man. I am blessed to be a stay-at-home mom! I just love the time that Little Man and I get to play, explore and be together! 

I am so thrilled to begin this journey with all of you!

-Kim

Saturday, March 17, 2012

Post Numero Uno

We decided it would be fun to start an informal blog where Kim and I post whatever suits our fancy to share with others. We'll both be contributing yummy foods (especially Kim- make whatever she writes about- she's a fabulous chef and baker!), sewing projects we're working on, deep thoughts, motherhood adventures, or ... really whatever we feel like.

As an initiation rite, I'm going to tell you about my latest sorta-obsession: SCONES! By sorta-obsessed, I mean that I've made them like 4 times in the last two weeks. In an effort to make them somewhat healthier (at least in my own mind) and awesomely delicious, I think I've nearly perfected my cranberry-orange variation. Make them, and tell me what you think!


Delicious Cranberry Orange Scones

1 cup oats
1 1/4 cup all-purpose flour
1/4 cup white sugar
1 1/4 tsp baking powder
1/4 tsp baking soda
1/2 tsp salt
8 tbsp butter, frozen
1/2 cup plain greek yogurt
1 egg
1/2 cup dried cranberries
1 orange
Crunchy sugar (like demerara or turbinado)

1. Pre-heat oven to 400 degrees.
2. In food processor, use chopper blade to grind oats into a fine powder.
3. In medium bowl, mix oats, flour, sugar, baking powder, baking soda, and salt.
4. In food processor, use slicer blade to grate butter into shreds. (I find it easier to cut the butter in half and grate it 1/2 at a time.)
5. Dump all the butter shreds into dry mix. Mix it all up together.
6. Zest the entire orange into the bowl, then carefully (so you don't get seeds in the dough) squeeze some of the juice from 1/2 the orange into the dough (maybe about 1 tablespoon of juice?). 
7. Use food processor, chopper blade, to chop cranberries into smaller pieces. Dump in dough.
8. In a small bowl, mix yogurt and egg. Dump into flour mixture. Mix up until large clumps form.
9. Take off your rings- you're about to get gooey. :-)
10. Use your hands to press the dough against the bowl and kneed until a big ball forms. (It might take a few minutes, but don't add any more liquid if it seems dry, it'll come together soon). 
11. On lightly floured surface, pat dough ball into a circle about 3/4 to 1 inch thick. Sprinkle with the crunchy sugar, and lightly press the sugar so it sticks. Slice into either squares or triangles (like a pie) with a sharp knife.
12. Put on a parchment paper lined baking sheet about 1 inch apart. Bake until golden- about 15 minutes.
13. Wait until slightly cooled to eat so you don't blister your tongue, but don't drool too much while waiting.


There may or may not have been an entire batch two days ago. Now there are only 4, I mean 3, left.

Enjoy these with a steaming cup of tea or coffee. And look for a new flavor soon!!

-Celina